
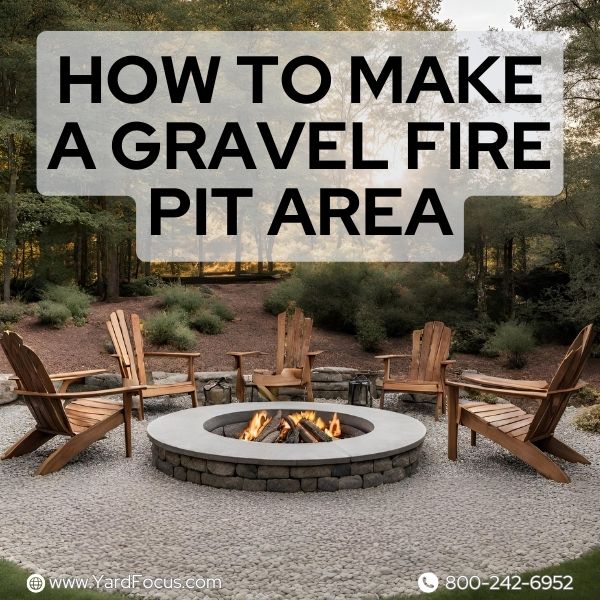
How To Make A Gravel Fire Pit Area
Knowing how to make a gravel fire pit area will allow you to create a cozy spot for outdoor gatherings.
This post will guide you through the process, from gathering supplies to enjoying your new fire pit.
Get ready to transform your space!
Necessary Supplies for Making a Gravel Fire Pit Area
Before beginning your gravel fire pit project, it is crucial to obtain any necessary permits and closely review local regulations regarding outdoor fires to ensure full compliance with safety codes and regulations.
Additionally, ensure your fire pit is placed at least 10 feet away from any structures, overhanging trees, or flammable materials to minimize fire risk.
To create a gravel fire pit area, you need certain supplies. Gather everything before you start to make the process smoother.

Here are the supplies you'll need:
- Fire Pit Kit: Find a kit that fits your style. While the stones in these kits are designed to fit together, using construction adhesive can enhance the stability and longevity of your fire pit.
- Pea Gravel: Pea gravel, known for its small size and smooth texture, serves as the base layer for comfort and aesthetics. However, consider using a layer of crushed stone beneath the pea gravel for improved drainage and stability. While it's more comfortable to walk on than larger aggregates, always wear appropriate footwear outdoors to protect your feet.
- Retaining Wall Blocks: These blocks form the border around your gravel area. They keep everything neat and contained.
- Concrete Adhesive: Use this glue to secure the top layers of your retaining wall blocks, ensuring stability and safety around your fire pit.
Having these items ready will help you create a cozy and inviting gravel fire pit area in your backyard.
Essential Tools for the Project
Creating a gravel fire pit area requires specific tools to make the job easier and more efficient.
Having the right equipment at hand ensures a smooth process from start to finish.
Here's what you'll need:
- Shovel: You'll use this for digging out the area where your fire pit will go. A sturdy, sharp shovel makes removing soil and any grass much simpler.
- Rake: After digging, a rake helps smooth out the ground. It's also perfect for spreading gravel evenly across the fire pit area.
- Tamper: This tool is crucial for creating a flat and compact base, improving stability, and reducing the risk of shifting and settling. Ensure the base is level before proceeding.
- Wheelbarrow: Transporting heavy materials like dirt, gravel, and stones becomes much easier with a wheelbarrow. You'll save time and avoid unnecessary strain.
- Gloves: Protect your hands with a durable pair of gloves. They prevent blisters and cuts while handling rough materials.
- Measuring Tape: To mark out your fire pit area accurately, you'll need a good measuring tape. Precise measurements ensure that everything fits together correctly.
- Level: Ensuring that your retaining wall and fire pit kit are level is crucial for stability and aesthetics. A level helps you check this quickly.
- Retaining Wall Blocks: These are necessary for creating a border around your fire pit area, as outlined in the project details.
Each of these tools plays an important role in the creation of your gravel fire pit area, ensuring safety, precision, and beauty in your backyard space.
Step-by-Step Guide to Creating a Gravel Fire Pit Area
Follow these easy steps to make your own gravel fire pit area and transform your backyard into a cozy gathering spot. Keep reading to learn how!

Mark the Area for the Fire Pit
Use spray paint, stakes, and string to outline where you want your fire pit to be.
Make sure the spot is open and away from any trees or structures that could catch fire.
Choose a level part of your yard so the fire pit area will be even.
Measure carefully to ensure the circle for your fire pit is the right size for your space.
Next, walk around the marked area to check it from every angle. This helps you see if you need to adjust anything before digging starts.
It's a good chance to imagine how it will look with pea gravel and possibly pavers or string lights added later on.
Adjustments are much easier at this stage than after starting construction, so take your time here.
Dig a Small Trench Around Your Marked Border
After marking the area for your fire pit, the next step is to dig a small trench around this border.
This trench plays a key role in keeping your gravel contained and shaping the patio space for your fire pit.
You need to make sure this trench is deep enough to hold back the pea gravel, stopping it from spreading outside your designated area.
This process ensures that the pea gravel stays right where you want it, helping define and maintain the neat outline of your fire pit area.
Digging this trench might seem like a simple task, but it's crucial for achieving a clean and well-defined outdoor space that will look great year after year.
Install a Retaining Wall Along the Border
For a sturdy and stylish border, build a retaining wall around your fire pit area.
Use edgers for this step. They not only keep the gravel in place but also add a decorative touch to your outdoor space.
Start by laying out the stones along the trench you dug earlier. Make sure each stone sits flush with the next to create an even and straight edge all around.
Next, check that your wall is level as you go. This will ensure it looks good and functions properly as a barrier for your gravel fire pit area.
With proper planning and attention to detail, your retaining wall will serve both as an effective border and an eye-catching addition to your backyard.
Now you can assemble your fire pit kit right in the center of this newly defined space.
Assemble Your Fire Pit Kit
Open your fire pit kit and lay out all the pieces. Check the manual to understand how each part fits together.
Follow the instructions step by step to put your fire pit in place inside the trench you've prepared.
This process should be simple, as most kits are designed for easy assembly without needing special tools.
After assembling your fire pit, ensure that the structure is stable and secure.
For added safety, consider consulting a professional to review the assembly and placement of your fire pit.
Fill the Area with Pea Gravel
Fill the area with your chosen gravel, spreading it evenly to ensure a consistent surface.
Confirm the depth meets your design needs for optimal fire safety. The process might feel like making a Japanese Zen garden.
It's calming and brings beauty to your fire pit area.
Consider the cost and availability of pea gravel in your area, as prices and colors can vary.
Choosing a gravel color that complements your outdoor space can enhance its aesthetic appeal.
Make sure the gravel covers all parts well, creating a solid base for your fire pit.
Additional Tips for a Successful Gravel Fire Pit Project
When choosing gravel for your fire pit area, consider both aesthetics and cost. While white pea gravel offers a distinctive look, it can be more expensive.
Explore local suppliers for the best deals, and remember that prices can vary based on color and type.
Exploring different colors and types might save you money. Make sure the gravel suits your backyard’s style and your fire pit design.
Using landscaping fabric beneath the pea gravel can significantly reduce weed growth and facilitate maintenance, making it a recommended step for ensuring the longevity and cleanliness of your fire pit area.
Evaluate your site's needs based on local conditions and preferences.
The project showed that even without landscaping cloth, dealing with weeds was not a big problem, thanks to the existing concrete rock base.
This approach simplifies installation and maintenance over time, especially in areas with tough weather conditions like Florida’s humidity.
Enhancements for Your Gravel Fire Pit Area
Your gravel fire pit area can become even more amazing with a few enhancements.
Think about adding a stone walkway, setting up a cozy seating area, or installing stone planters for an extra touch of charm.
Adding a Stone Walkway
Adding a stone walkway enhances the look and accessibility of your gravel fire pit area.
First, you select stones that match or complement your fire pit and seating area.
Lay them out to form a path from your house or garden to the fire pit.
This creates an inviting route for guests and adds a touch of elegance.
Ensure each stone is firmly placed in the ground to prevent shifting. You can use sand or small pebbles underneath for stability.
Space the stones evenly for easy walking.
A well-placed walkway not only improves safety by guiding visitors directly to the fire zone but also minimizes grass and dirt getting tracked into the gravel area.
Creating a Fire Pit Seating Area
After laying down a stone walkway, the next step is crafting a cozy seating area around your fire pit.
To start, use pea gravel and edgers for the foundation of your seating zone.
This combination offers aesthetic appeal and a stable surface for furniture, ensuring your seating area is both inviting and practical.
Choose comfortable fire pit chairs that match your outdoor decor to invite relaxation and conversation.
This approach takes your gravel fire pit area to the next level by making it both functional and stylish.
Installing Stone Planters
Installing stone planters around your gravel fire pit area adds a touch of elegance and helps define the space.
First, choose planters that match or complement the style of your fire pit and gravel.
Lay them out where you want them to go. Make sure they are evenly spaced and create a cohesive look with the rest of your fire pit area.
Fill these planters with plants that can handle the heat from the fire pit and add some color or greenery to your outdoor space.
Hardy succulents or native flowers are great choices.
These plants will not only beautify your area but also attract butterflies and birds, making your fire pit gatherings more enjoyable.
FAQs
What do I need to start making a gravel fire pit area?
To start, you'll need a clear space in your yard, some tools for digging, gravel for the ground, and materials to make the fire pit.
How do I choose the right spot for my gravel fire pit area?
Pick a spot away from trees and buildings. Make sure it's on level ground to keep your fire safe.
Can I build my own fire pit in the gravel area?
Yes! You can build your own fire pit using bricks or stones. Just make sure it's surrounded by gravel to catch any stray sparks.
How much gravel will I need for my fire pit area?
The amount of gravel depends on how big your fire pit area is going to be. Measure your space first, then buy enough gravel to cover it about 2 inches deep.

Conclusion
Discovering how to make a gravel fire pit area is exciting and affordable.
This project transforms your backyard into a cozy gathering spot, even on tight budgets and schedules.
With the right tools, supplies, and steps, anyone can create an inviting outdoor space.
Add chairs, string lights, or stone walkways to customize your area. Enjoy warm nights by the fire with friends and family in your new gravel fire pit area!